Laser Cutting
Week 2 (Tutorial)
Background Information
A laser cutter refers to a machine that uses motors that are controlled by a computer to cut and engrave material using a laser beam. Since the type of laser cutter machine used in the FabLab is the carbon dioxide (CO2) laser cutter machine, we will be focusing our scope on the CO2 laser cutter machine.
Working Principles
- The CO2 laser cutter machine contains a mechanism called the CO2 laser tube, which produces the CO2 laser. It is a glass tube with carbon dioxide gas and some nitrogen gas sealed in it.

Figure 1: CO2 laser tube (HPC Laser, no date)
- High voltage electricity is passed through the tube, which excites the gas particles and produces a laser beam.
- One end of the tube contains a partially-reflective mirror, while the other end holds a fully-reflective mirror. The light is reflected back and forth by the two mirrors, which increases the intensity of light as it flows through the tube. Eventually, the light becomes powerful enough to pass through the partially reflective mirror.
- The light is guided to the first mirror outside of the tube, then to a second, and finally the third. These mirrors are used to accurately deflect the laser beam in the desired directions.
- It is eventually directed through a focus lens inside the nozzle, and onto the workpiece. The focus lens refines the path and power of the laser beam, ensuring it is focused on a precise spot.
- The combination of forward and backward, and side-to-side movement lets the laser get bounced around in any position in 2D space, letting us cut and engrave in any shapes we need.
- The control system in the laser cutter machine allows it to move the laser head in different directions over the work bed. The focused laser beam can be quickly moved around the machine bed to create different shapes without any loss in power or accuracy.

Figure 2: Interior of a laser cutter machine (HPC Laser, no date)
Suitable Materials
The material and the thickness that a CO2 laser cutter machine can cut is dependent on the power of the laser tube and the focusing lens. In general, a more powerful CO2 laser tube is able to cut thicker and harder material because it can compensate for the focusing limitation of the focusing lens.
- Metals: All types of metals can be cut, but they require laser cutter machines that are bigger and more expensive, which the FabLab do not possess. Metals that are more reflective (e.g. aluminium) are also more difficult to cut, and may require other types of cutters.
- Wood: Plywood, natural wood and medium-density fibreboard (MDF) wood can be cut, but they may contain oils or resins that can result in fire or burnt marks.
- Paper and Cardboard: Paper products such as art cards and technical boards can be cut, but there is a risk of burnt marks and fire occurring.
- Plastics: Acrylics are the most suitable plastic to be laser cut, as they leave a great finish when laser cut, and are often used in prototyping and final products.
- Glass: Laser cutter machines are able to cut glass, but it is difficult because of the fragile and reflective properties of glass.
Materials That Should Not Be Used
- Polyvinylchloride Plastic (PVC): Cutting PVC will emit acids and toxic fumes, which are harmful to both the operator and the laser cutter machine, as they can cause corrosion.
- Polysterene/Polypropylene Foam: Both materials are flammable and catch fire easily.
Safety Measures
- Do not look directly at the laser beam when it is running: Staring at it directly can cause damage to the eye. Wear laser-safe windows or goggles.
- Avoid cutting flammable materials to prevent fires from occurring: Equip the laser cutter machine with an air assist to blow away any dust and smoke from the laser. If a small fire occurs, attempt to extinguish by blowing it or removing the material from the laser cutter machine. A fire extinguisher should be mounted on the wall near the laser cutter machine.
- Install a fume hood or ventilation system in the laser cutter machine: As the laser burns away material, it creates fumes. Some fumes are very toxic and need to be avoided. Preferably, avoid cutting materials that produce harmful fumes when cut.
- Never leave the laser cutter machine unattended when it is operating: If the power setting of the laser is too high, the laser will cut through the material and concentrate on the case bottom of the laser cutter machine. It may cause damage to the exterior of the case bottom, fry electronic components and even start a fire.
- Clean and vacuum the cutting deck and the internal cavity of the laser cutter machine regularly: Small particles of cut materials (e.g. sawdust) can ignite and cause explosions. Leaving leftover scrap in the catch-bin can also become a fire hazard. Regularly clean the focus lens, as continued use of dirty lens will result in cracked lens, which will further result in fire.
We also learned about vector and raster graphic files for professional printing.
- Vector files are made up of points and lines to create paths. They are most often used to create company logos and icons, as they can scaled up and down without losing their image quality. Since vector files only contain lines and anchor points, they tend to have smaller file sizes
- Raster files are made up of pixels. They appear as little squares when the image file is zoomed in or enlarged. Each image contains a fixed amount of pixels, and these fixed amount of pixels determine the quality (resolution) of the image. Larger amounts of pixels will result in images of better resolution, but it will also increase the size of the image file.

Figure 3: Comparison between Vector and Raster Images (DINFOS Pavilion, 2020)
Next, we were given an introduction to CorelDraw, a graphic design software. This software can be used to create simple shapes and lines, as well as more complex designs which are used to create illustrations, clipart and logos.
Lastly we watched a video on Kerf. Kerf refers to the width of material that is removed by a cutting process. It is also referred to as "kerf offset". Since the laser has its own width, it will cause some of the original design to be displaced during cutting, which will alter the dimensions of the design. The amount of kerf is dependent on the size and width of the laser. It can be compensated for by modifying the design to take into account the amount of material that will be removed by the laser due to kerf.
Most modern laser cutter machines are able to take the actual kerf amount and automatically offset the tool path by half of the kerf amount, allowing the finished part to be very close to the programmed dimensions. Kerf for every process is different as each cutting process removes a different amount of material, or kerf. Generally, more precise processes, like waterjet and laser, remove a smaller amount of kerf. Kerf also becomes wider as the thickness of the material being cut increases.
References
Blog.fslaser.com. 2017. 5 Laser Cutter Safety Tips for New Users. [online] Available at: <http://blog.fslaser.com/experts/laser-cutter-safety-tips-for-new-users> [Accessed 27 October 2021].
DINFOS Pavilion. 2020. Vector vs. Raster Images: Choosing the Right Format. [online] Available at: <https://pavilion.dinfos.edu/Article/Article/2223089/vector-vs-raster-images-choosing-the-right-format/> [Accessed 29 October 2021].
Ehs.mit.edu. n.d. Laser Cutter Safety – EHS. [online] Available at: <https://ehs.mit.edu/workplace-safety-program/laser-cutter-safety/> [Accessed 27 October 2021].
Esabna.com. n.d. What is cutting kerf?. [online] Available at: <https://www.esabna.com/us/en/education/blog/what-is-cutting-kerf.cfm> [Accessed 29 October 2021].
Further Fabrication (2019) How CO2 Laser Cutters work and ...Why you might want to build one!. [online video] Available at: https://www.youtube.com/watch?v=t4BfQGhhbOQ&ab_channel=FurtherFabrication [Accessed 27 October 2021]
HPC Laser | Quality Laser Cutting Equipment. n.d. How does a Laser Cutter work? | HPC Laser. [online] Available at: <https://hpclaser.co.uk/how-does-a-laser-cutter-work/> [Accessed 27 October 2021].
Paulsen, A., 2016. Graphic Files Explained: Vector vs Raster | Acro Media. [online] Blog.acromedia.com. Available at: <https://blog.acromedia.com/graphic-files-explained-vector-vs-raster> [Accessed 29 October 2021].
Powell, B., 2019. How to Be Safe When Laser Cutting at Home | Maker Freedom. [online] Maker Freedom. Available at: <https://makerfreedom.com/how-to-be-safe-when-laser-cutting-at-home/> [Accessed 27 October 2021].
Powell, B., 2019. Laser Cutting Materials - A Proper Guide (Lists) | Maker Freedom. [online] Maker Freedom. Available at: <https://makerfreedom.com/laser-cutting-materials-guide/> [Accessed 27 October 2021].
SendCutSend. 2019. What Is Kerf in Laser Cutting?. [online] Available at: <https://sendcutsend.com/what-is-kerf-in-laser-cutting/> [Accessed 16 November 2021].
Velling, A., 2020. What Materials Are Suitable for Laser Cutting? | Fractory. [online] Fractory. Available at: <https://fractory.com/what-can-laser-cutters-cut/> [Accessed 27 October 2021].
Velling, A., 2020. What Materials Are Suitable for Laser Cutting? | Fractory. [online] Fractory. Available at: <https://fractory.com/what-can-laser-cutters-cut/> [Accessed 27 October 2021].
Wroffy.com. 2020. Benefits of CorelDraw for Business | CorelDRAW Graphics Suite 2020. [online] Available at: <https://www.wroffy.com/benefits-of-coreldraw-for-business/> [Accessed 29 October 2021].
Week 4 (Practical)
For the practical in week 4, we went to the FabLab at T11C so that we could gain some experience on how to operate the laser cutter machine.
As part of our pre-practical activity, we were required to prepare a Standard Operating Procedure (SOP) on the operation of the laser cutter machine that we could refer to during the practical. We were required to undergo a competency test on how to operate the laser cutter machine according to this SOP. During the practical itself, we learned a few new things from our lecturers, and included these new information in the improved SOP. The improved SOP can be seen below, where parts with strikethrough have been removed and parts that have been highlighted are new additions.
1. Purpose
The purpose of this Standard Operating Procedure (SOP) is to describe the steps taken to operate the Epilog Laser Cutter Machine in the FabLab at T11C.
2. Safety
Materials
- Avoid cutting flammable materials to reduce the risk of fire. Avoid cutting metals. Also, do not use materials with chlorine or foam as they will release toxic gases when exposed to high temperatures.
- Make sure the material thickness is no thicker than 5mm as the laser cutter cannot cut deeper than that.
General/Personal Safety
- Do not lean over the cutter machine and stare into it when it is cutting. Staring into the laser while it is in operation can cause damage to the eyes.
- Never leave the laser cutter unattended when it is operating. If the power settings of the laser are too high, the laser will cut through the material and concentrate on the case bottom of the laser cutter. It may cause damage to the exterior of the case bottom, fry electronic components and even start a fire
- Do not have anything around the neck (e.g. lanyards) as it may cause the user to be entangled into the laser cutter. Long hair should also be tied up so that it does not get caught in the laser cutter machine.
Laser Cutter Machine
- Clean and vacuum the cutting deck and the internal cavity of the laser cutter regularly. Small particles of cut materials (e.g. sawdust) can ignite and cause explosions.
- When opening the laser cutter, make sure the cover is opened fully.
- Do not put your head inside the laser cutter when the cover is half-open.
- Do not slam the cover of the laser cutter. Instead, close the cover gently. Ensure that the interlocking light on the side panel is lit.
- Always check that the two LED lights on the side panel are on. This will tell us that the cover of the laser cutter is fully closed.
3. Procedure
a. Start-up
Step 1: Turn on the air compressor 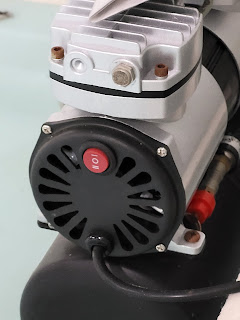
Figure 4: Air Compressor
Step 2: Turn on the fume extractor (green button, left side of machine).

Figure 5: Fume Extractor
Step 3: Turn on the on-off switch (black switch, bottom right corner of machine). Wait for the laser cutter to finish the initialisation process.

Figure 6: On-Off Switch
Step 4: While waiting for the laser cutter to finish the initialisation process, Once the laser cutter is fully set up, head over to the workstation to send the 3D drawing to the laser cutter.
b. Operation
Step 1: Use vernier calipers to measure the thickness of the material, and load it into the laser cutter.
Step 2: Open the imported DXF or SVG file in CorelDraw.
Step 3: Select the part to be cut/engraved/etched.
Step 2: Open the imported DXF or SVG file in CorelDraw.
Step 3: Select the part to be cut/engraved/etched.
- For parts to be cut, the colour of the border should be red, and its line weight should be hairline.
- For parts that will be engraved, the colour of the border should be green, and the part to be engraved should also be filled green.
- For parts that will undergo scoring, the colour of the border should be green, and it should have a line weight that is hairline.
|
Jargon |
Vector Cut |
Engrave |
Engrave Etch/Score |
|
Colour |
Red |
Green |
Green |
|
Line Weight |
Hairline |
- |
Hairline |
|
Fill |
- |
Green |
- |
Step 4: Once the parts to be created have been selected, send the file for printing (top left corner, fourth icon).
Step 5: On
the new interface, turn on “Auto Focus”. For the Epilog M2 machine,
“Auto Focus” must be set to “ON”, while for the Epilog Pro machine, it
must be set to “THICKNESS”.
Step 6:
Turn on “Air Assist”.
Step 7:
Import material settings to select the type of material that will be
cut, and key in the thickness of the material.
For engraving, select “Engrave”.
For cutting, select “Vector”.
Step 8:
Once complete, click “Print” (bottom right corner). This will send the
file to the laser cutter.
Step 9:
Load the material to be cut into the machine.
- For Epilog Fusion Pro, adjust the material such that it is being cut at empty spaces of material, to help save material.
- For Epilog Fusion M2, adjust the objects using the mouse tool on the left bar and adjust based on the location of the 2 rulers on the top and on the left.
Step 10:
Check that the name on the laser cutter display screen is the same as
the file name on the Epilog dashboard. Take note of the estimated time
required for cutting.
Step 11:
On the Epilogue Fusion M2 machine, press “Go” to start the cutting
process. On the Epilogue Fusion Pro machine, press “Play”.
Step 12:
Once the laser cutting process is complete, let it rest for 1 minute
inside the laser cutter to let it cool down and allow the fume extractor to remove the toxic fumes produced from the process.
Step 13:
Open the laser cutter and remove the cut material.
Table 2: Summary of Epilog Dashboard Functions
c. Shutdown
Step 1: Once the laser cutter machine has cooled down, turn off the on-off switch.
Step 2: Switch off the fume extractor.
Step 3: Switch off the air compressor.
Step 4: Clean up the interior of the laser cutter machine, as well as the surrounding area. Ensure that there is no dust or scrap materials left behind.
Vector Cut | Engrave | Engrave Etch/Score | |
Settings | Use Material Library Folder | Set Process Type to VECTOR SPEED
& POWER: Follow engraving values | |
Thickness | Depends on the material | ||
c. Shutdown
Step 1: Once the laser cutter machine has cooled down, turn off the on-off switch.
Step 2: Switch off the fume extractor.
Step 3: Switch off the air compressor.
Step 4: Clean up the interior of the laser cutter machine, as well as the surrounding area. Ensure that there is no dust or scrap materials left behind.
CorelDraw
Import the file containing the design file to be cut into CorelDraw as a DXF or SVG file. On the new interface, we can select which parts will be cut or engraved.

Figure 7: CorelDraw Interface
The guidelines for cutting or engraving a part can be found in Table 1 above.
After the parts to be cut or engraved have been selected, the file can be sent for printing.

Figure 8: Sending the file for printing
After the file has been sent for printing, a new interface in Epilog will pop up.
Epilog Dashboard
Ensure auto focus and air assist are turn on. At the right side of the interface, input the thickness of the material into the software.

Figure 9: Auto Focus

Figure 10: Air Assist + Material Thickness
Double-check that the process of each object's action is correct. The Epilog Dashboard functions for cutting or engraving a part can be found in Table 2 above.

Figure 11: Cutting and Engraving
Upload the material settings by importing it from the Material Library.

Figure 12: Material Library
Load the material into the laser cutter machine.

Figure 13: Laser Cutter Machine Interior
Send the file to the laser cutter machine for printing. Check that the name on the laser cutter display screen is the same as the file name on the Epilog dashboard and take note of the estimated time required for cutting.

Figure 14: Sending the File for Printing

Figure 15: Confirming the Print on the Laser Cutter
Once the laser cutting process has concluded, allow the product to rest inside the laser cutter machine for 1 minute.
For this practical, we designed a parametric model to be laser cut in Fusion 360. Our original design was that of a birdhouse.

Figure 16: Fusion 360 Sketches for Birdhouse Parts

Figure 17: Fusion 360 Parametric Dimensions for Birdhouse
However, due to an issue with the angle and length of the roof, we were unable to cut this design, so we decided to cut something that was simpler, which was a wooden storage chest.

Figure 18: Fusion 360 Sketches of Wooden Storage Chest

Figure 19: Fusion 360 Parametric Dimensions for Wooden Storage Chest
During the laser cutting process, everything went smoothly, as we had already taken the laser cutting competency test and had an idea of what to do.


Figure 20: Cutting Process Figure 21: Final Product Figure 22: Hero Shot
However, when our final product was cut, we found that the connection between the pieces was not tight enough, and they would fall apart easily. This was due to kerf, which we had forgotten to take into consideration during the design process. In order to reduce the effect of kerf on the fit of the pieces, we can change the parametric values to be slightly bigger. This could potentially make the pieces fit better overall.
In general, this practical was very important as it allowed me to put into practice what I had learned in the tutorial, with regards to operating the laser cutter machine. It also allowed me to gain some experience in using the laser cutter machine, as I had not used one before. The SOP the group created was indispensable as it was what I had to refer to when we were operating the laser cutter machine.
The activity was very interesting, as I was given the opportunity to laser cut parametric designs of our own, which filled me with a sense of accomplishment of having created a successful product, even if the dimensions were slightly off due to kerf. In the future, if I am required to laser cut any pieces for our future projects, I will be more confident in doing so.


Comments
Post a Comment